Analyze with AI
Get AI-powered insights from this Mad Devs tech article:
The journey from idea to fully functioning software product is a long one that begins, sometimes, with a black-and-white sketch written in a notepad and ends as a functioning app in the hands of an end-user. The initial stages of the SDLC (software development life cycle) involve planning and designing, which in turn require the use of mockups and prototypes. While they may seem similar, there are key differences between the two concepts, which this article will explore. Furthermore, the text will explain why software teams need to invest time and resources into mockups and prototypes.
The basics: wireframes, mockups, and prototypes
There are several terms that teams may encounter in SDLC literature and the project journey:
✔ Wireframe
✔ Mockup
✔ Prototype
While the focus of this article is on mockups and prototypes, teams can benefit from an understanding of wireframes. These are a low-fidelity visual guide that represents the skeletal structure of a user interface (UI). Wireframes outline the layout, content placement, and basic interactions without a focus on design elements like colors, fonts, or images. It is a combination of simple patterns and wordings. The key features of wireframes include:
- Basic layout: Shows the arrangement of UI elements
- Navigation flow: Depicts how users move through the interface.
- No styling: Uses simple boxes, lines, and placeholders instead of detailed design.
- User interaction: Highlights essential functionalities like form fields, links, and buttons.
- Clarifies requirements: Helps stakeholders and developers align on the structure before detailed design work begins.
- Saves time: Prevents rework by addressing usability issues early.
- Improves UX: Ensures a logical and user-friendly layout before finalizing the interface.
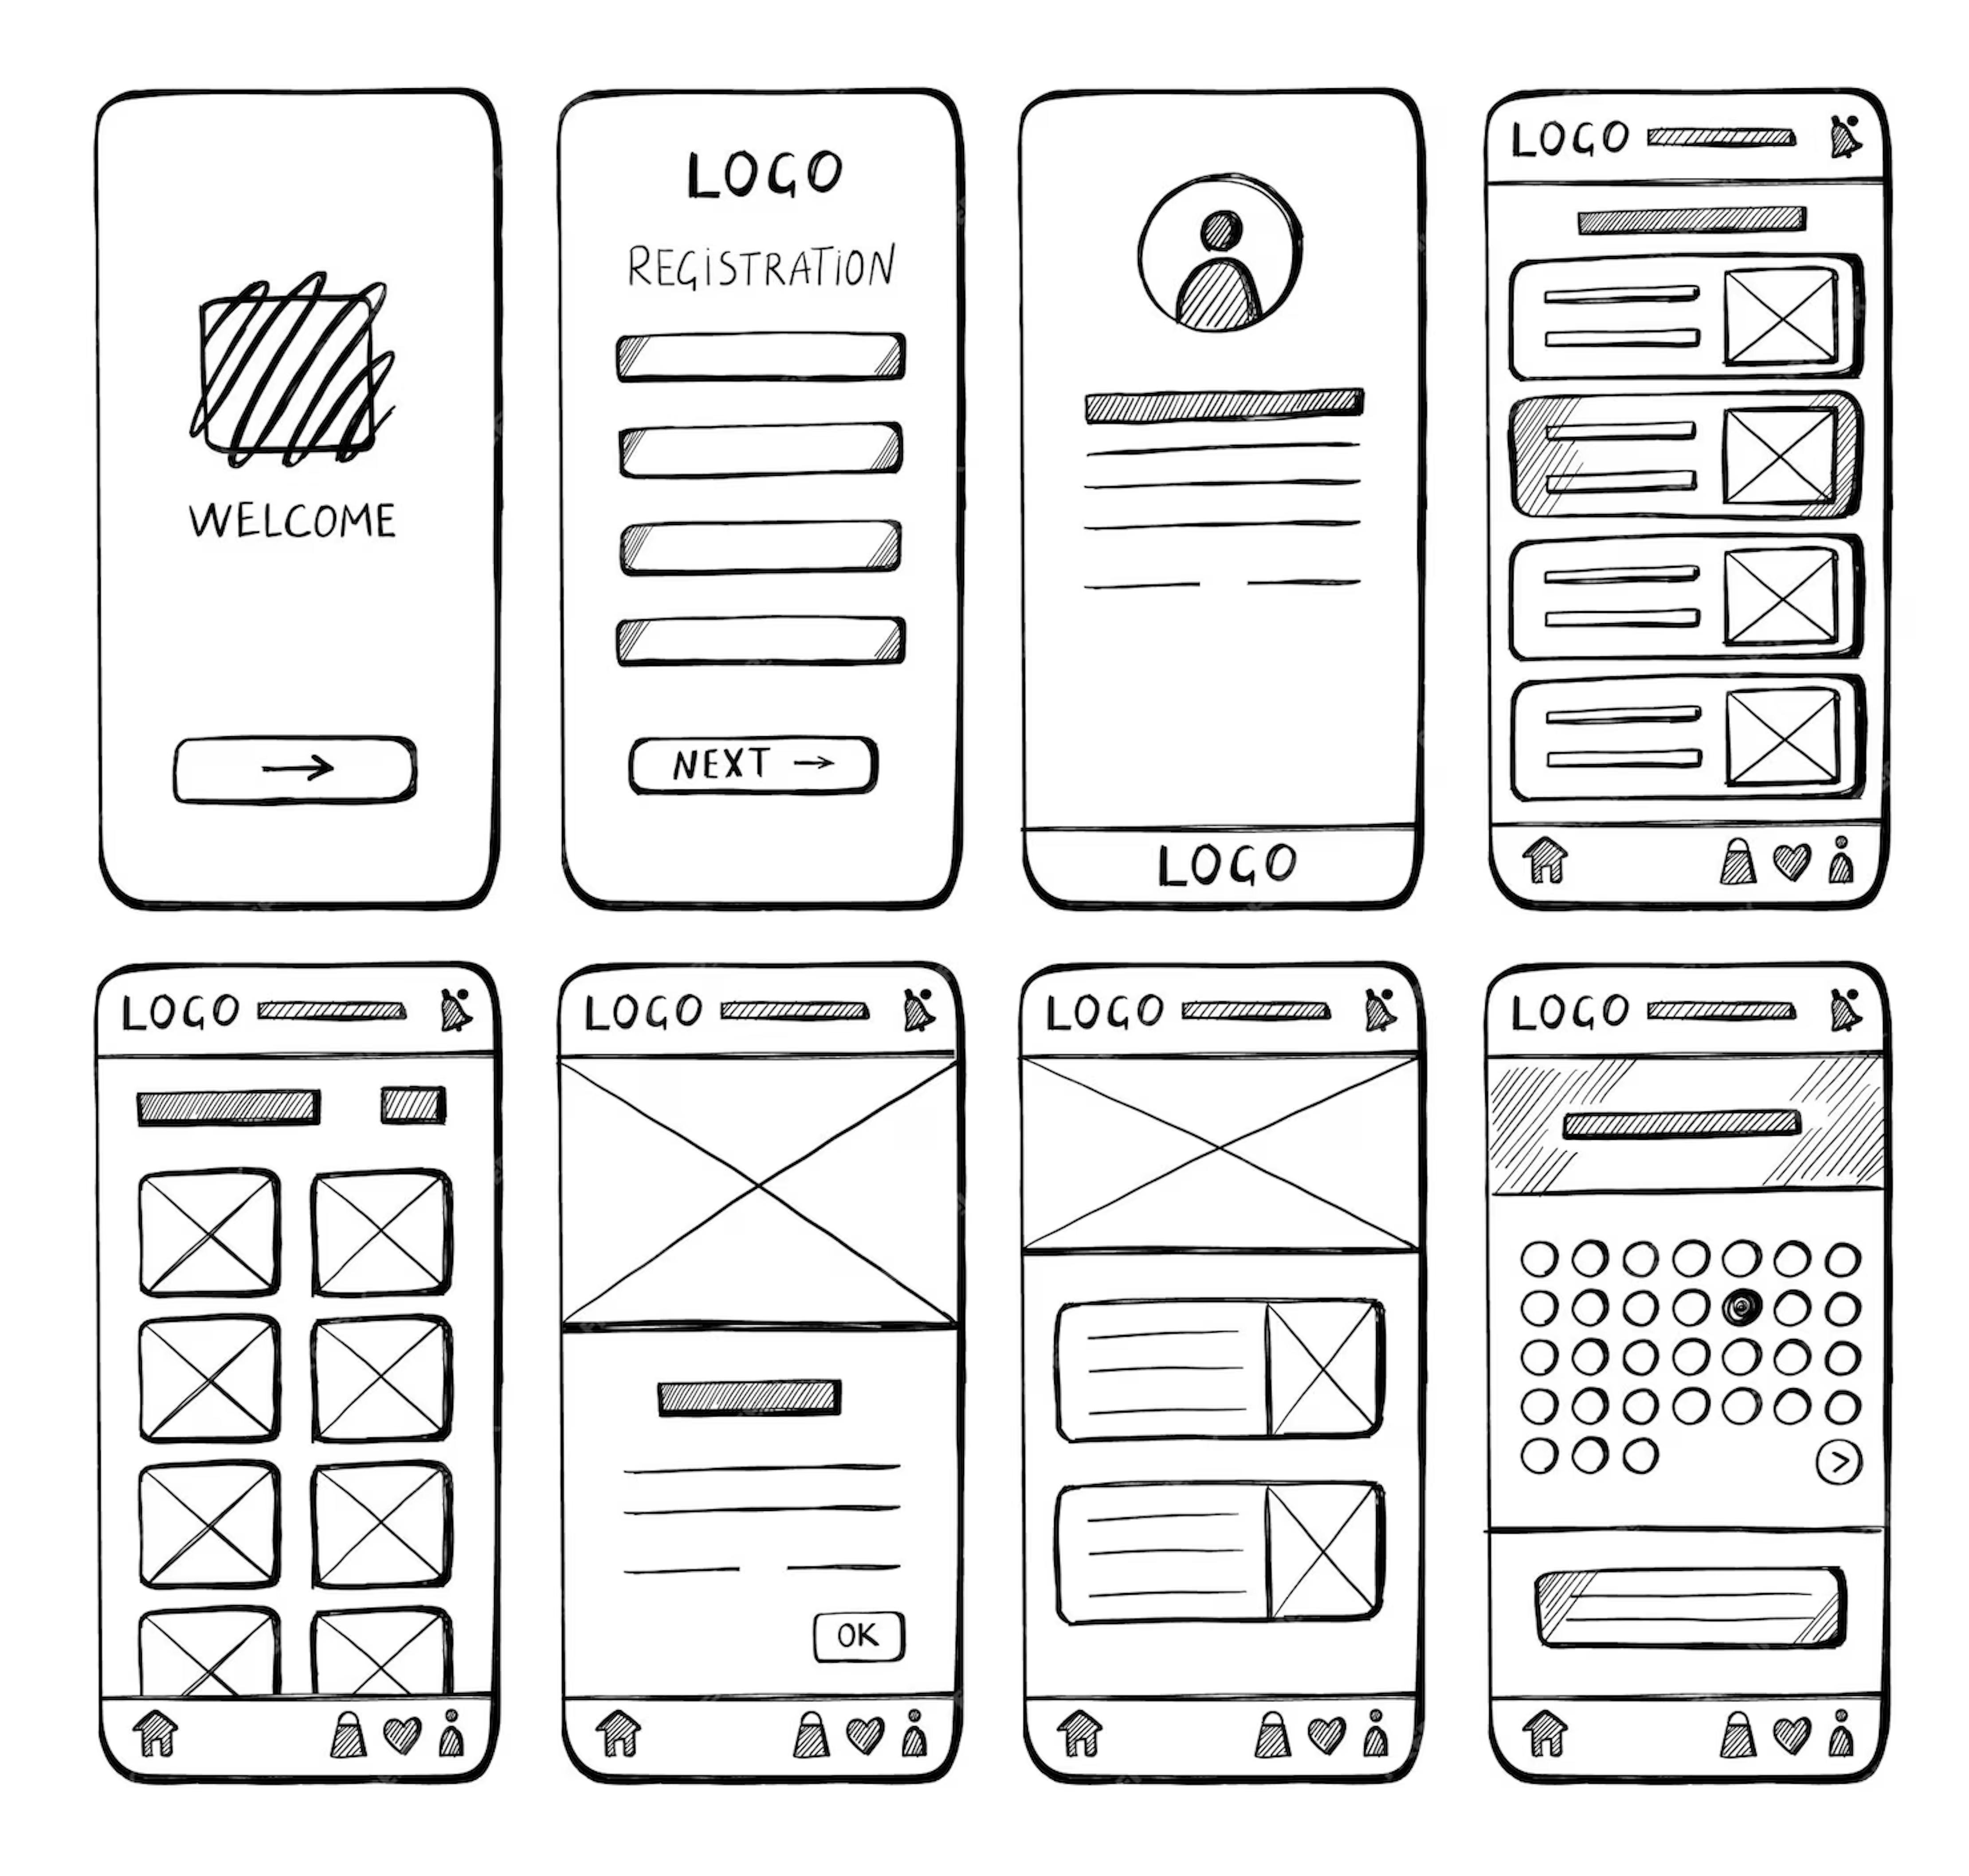
As wireframes are an initial layout, there is no need for a professional designer to create one. Since they focus on functionality and structure, not aesthetics, any member of the team can develop the wireframe, given they have a basic understanding of how to organize content in a logical manner, prioritize key elements based on user needs, and develop intuitive navigation. Although wireframes can even be drawn on paper in some circumstances, digital representations are easier to share and adjust as needed. With a wireframe, the team can begin to think about the details of the product and move on to the mockup.
Mockups explained: when design meets brand identity
A mockup is a mid- to high-fidelity visual representation of a user interface (UI) that is a step closer to resembling the future product than a wireframe. Unlike a wireframe, it includes design elements such as colors, typography, icons, and branded images but lacks interactivity. The final point means that a mockup can't be used to check a product's functionality. Despite the lack of interactivity, mockups do more than add color to wireframes and provide a visual overview of the app. They are useful in acquiring a sense of user experience. Mockups display the entire range of a product's elements, including:
- Images
- Icons
- Logos
- Content
- Typography
- Navigation
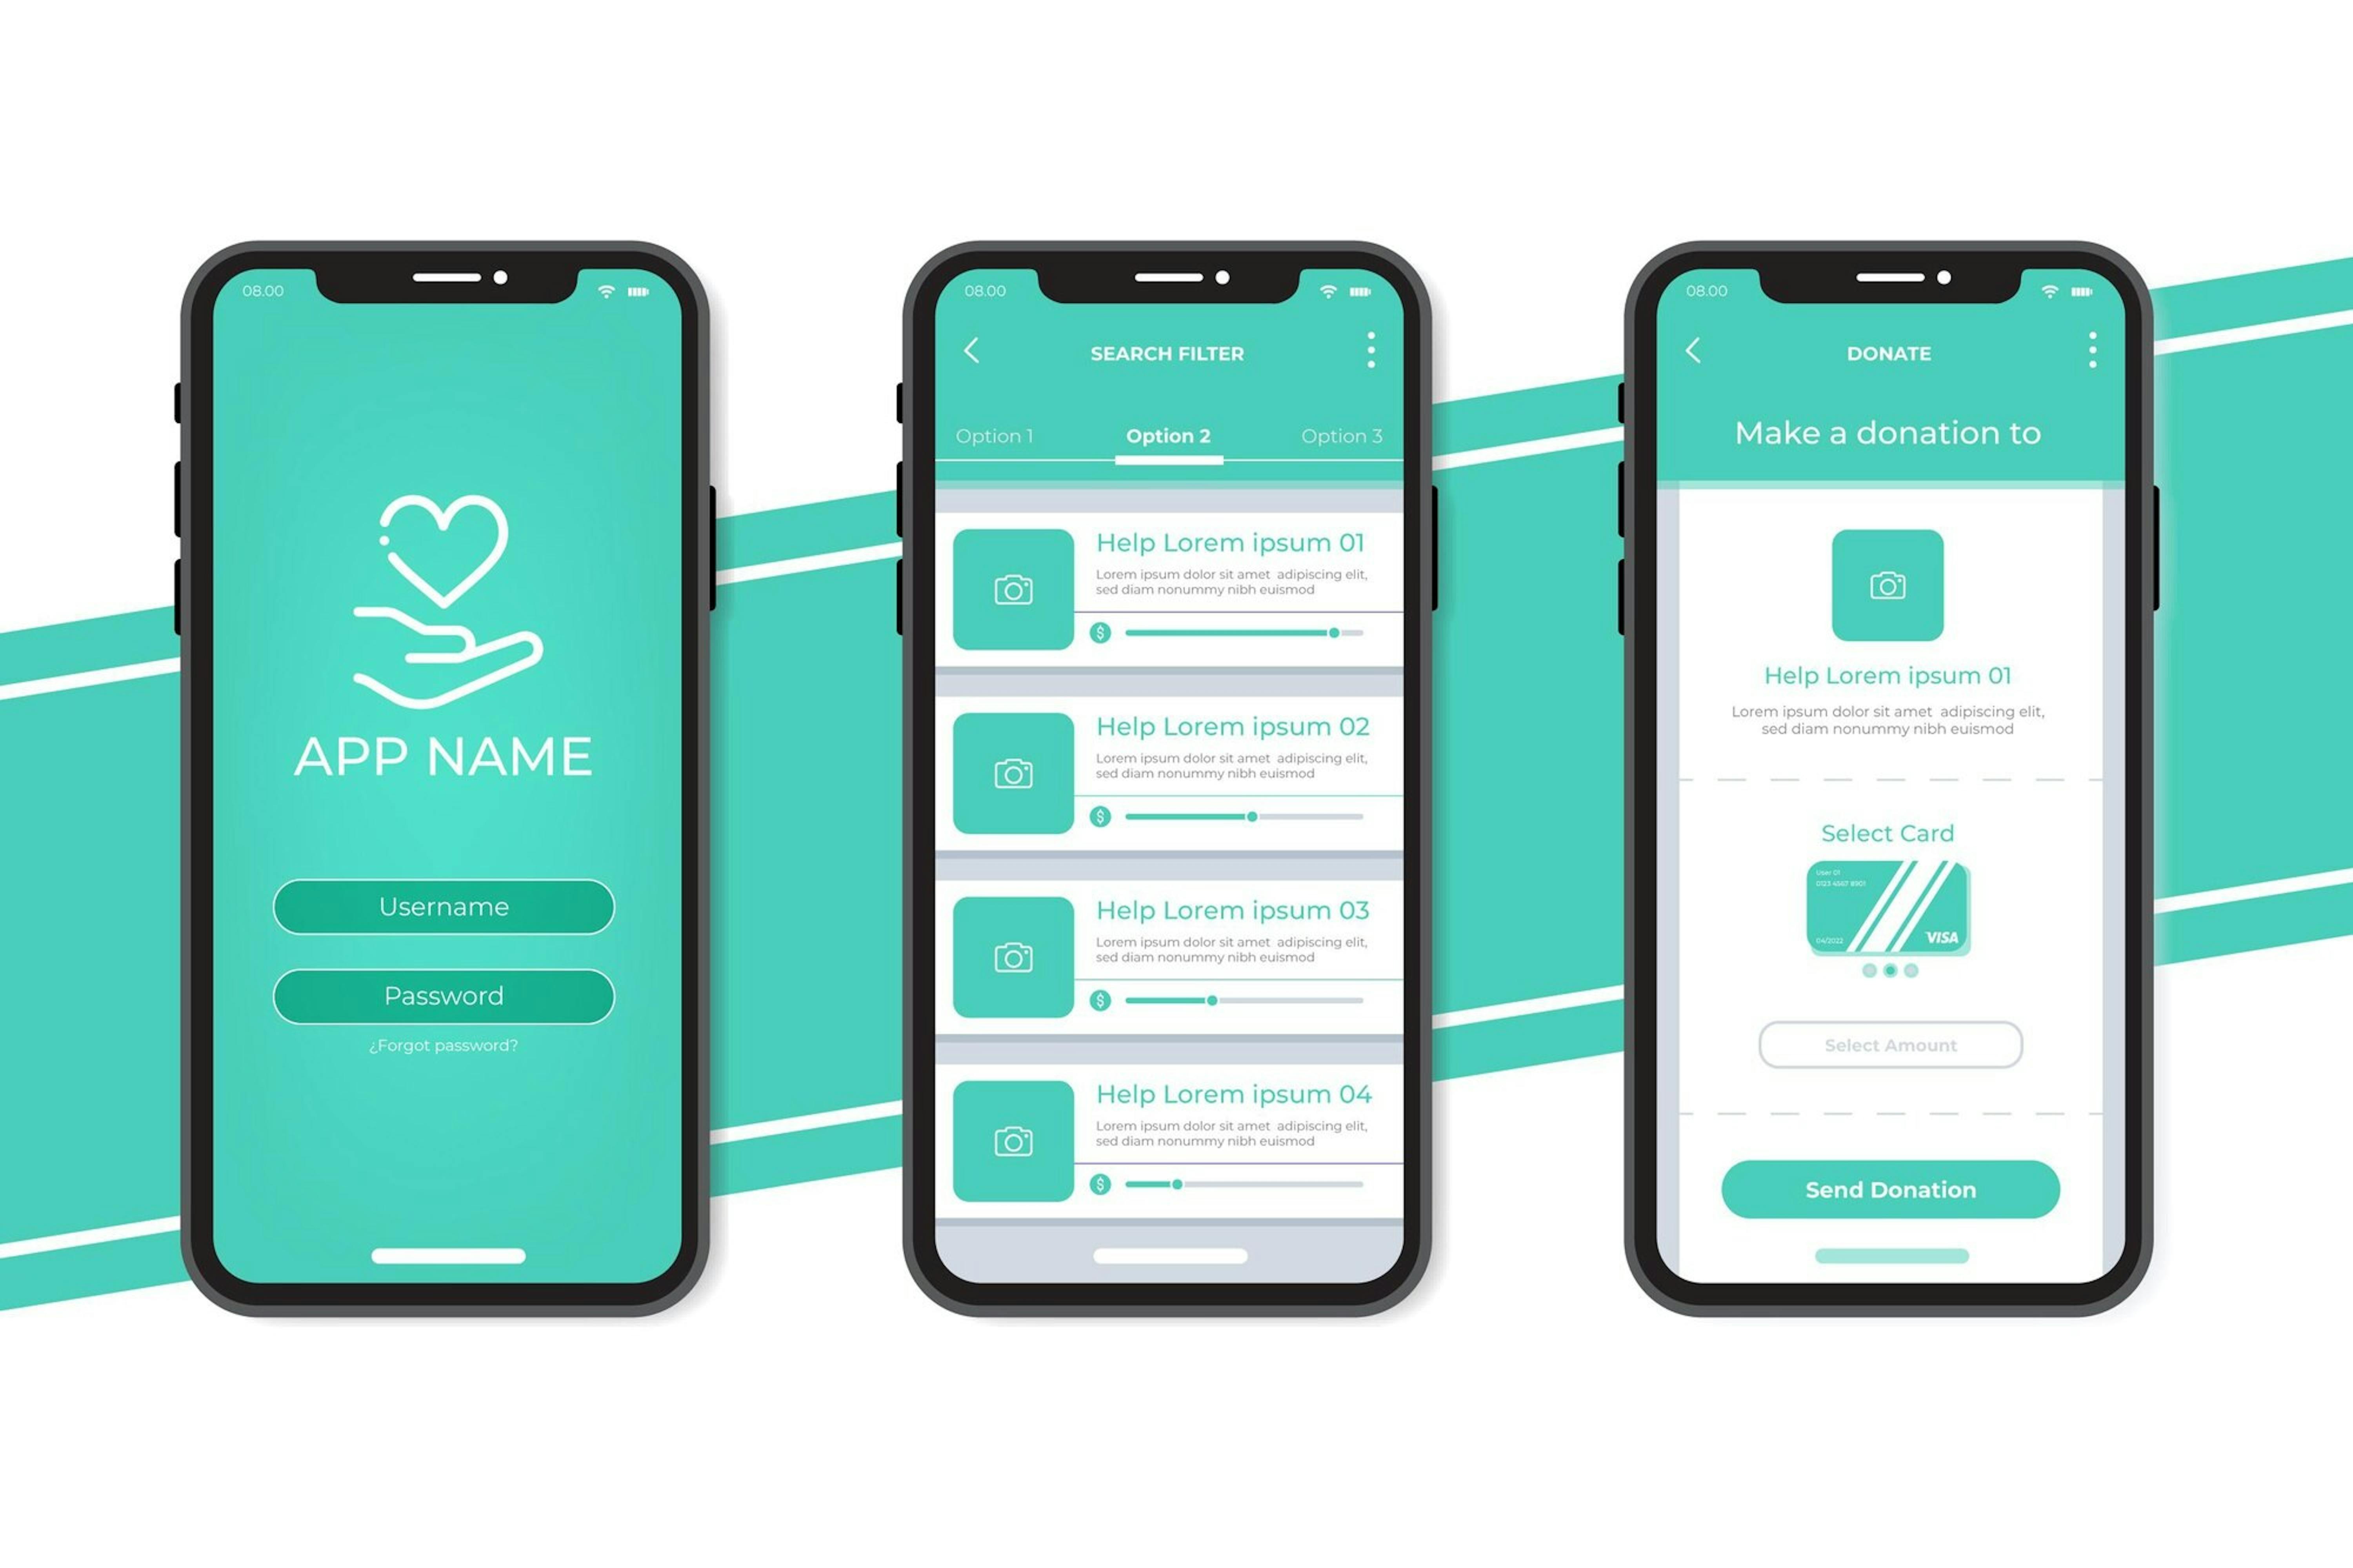
Software mockups use a variety of visuals to showcase brand identity, and building them requires a mixture of creativity and special skills, which is why professional designers are required at this stage. Tools like Figma, Adobe XD, and Sketch are used to create mockups.
Prototypes explained: adding more detail and functionality
Once the mockup has been adjusted to resemble the desired product, the team begins creating a prototype. This is a high-fidelity and, most important, interactive model of the product. A prototype simulates user interactions and allows the team to test the solution without completing the full development cycle. The level of fidelity and interaction can differ depending on various factors. Some prototypes may demonstrate the core functionality of a product, while others allow for minimum interaction. Regardless of these details, the main goal of a prototype remains: to simulate user behavior and ensure the UI and UX designs meet all user requirements. Similar to mockups, prototypes can be created in Figma and Adobe XD, as well as in Axure and InVision.
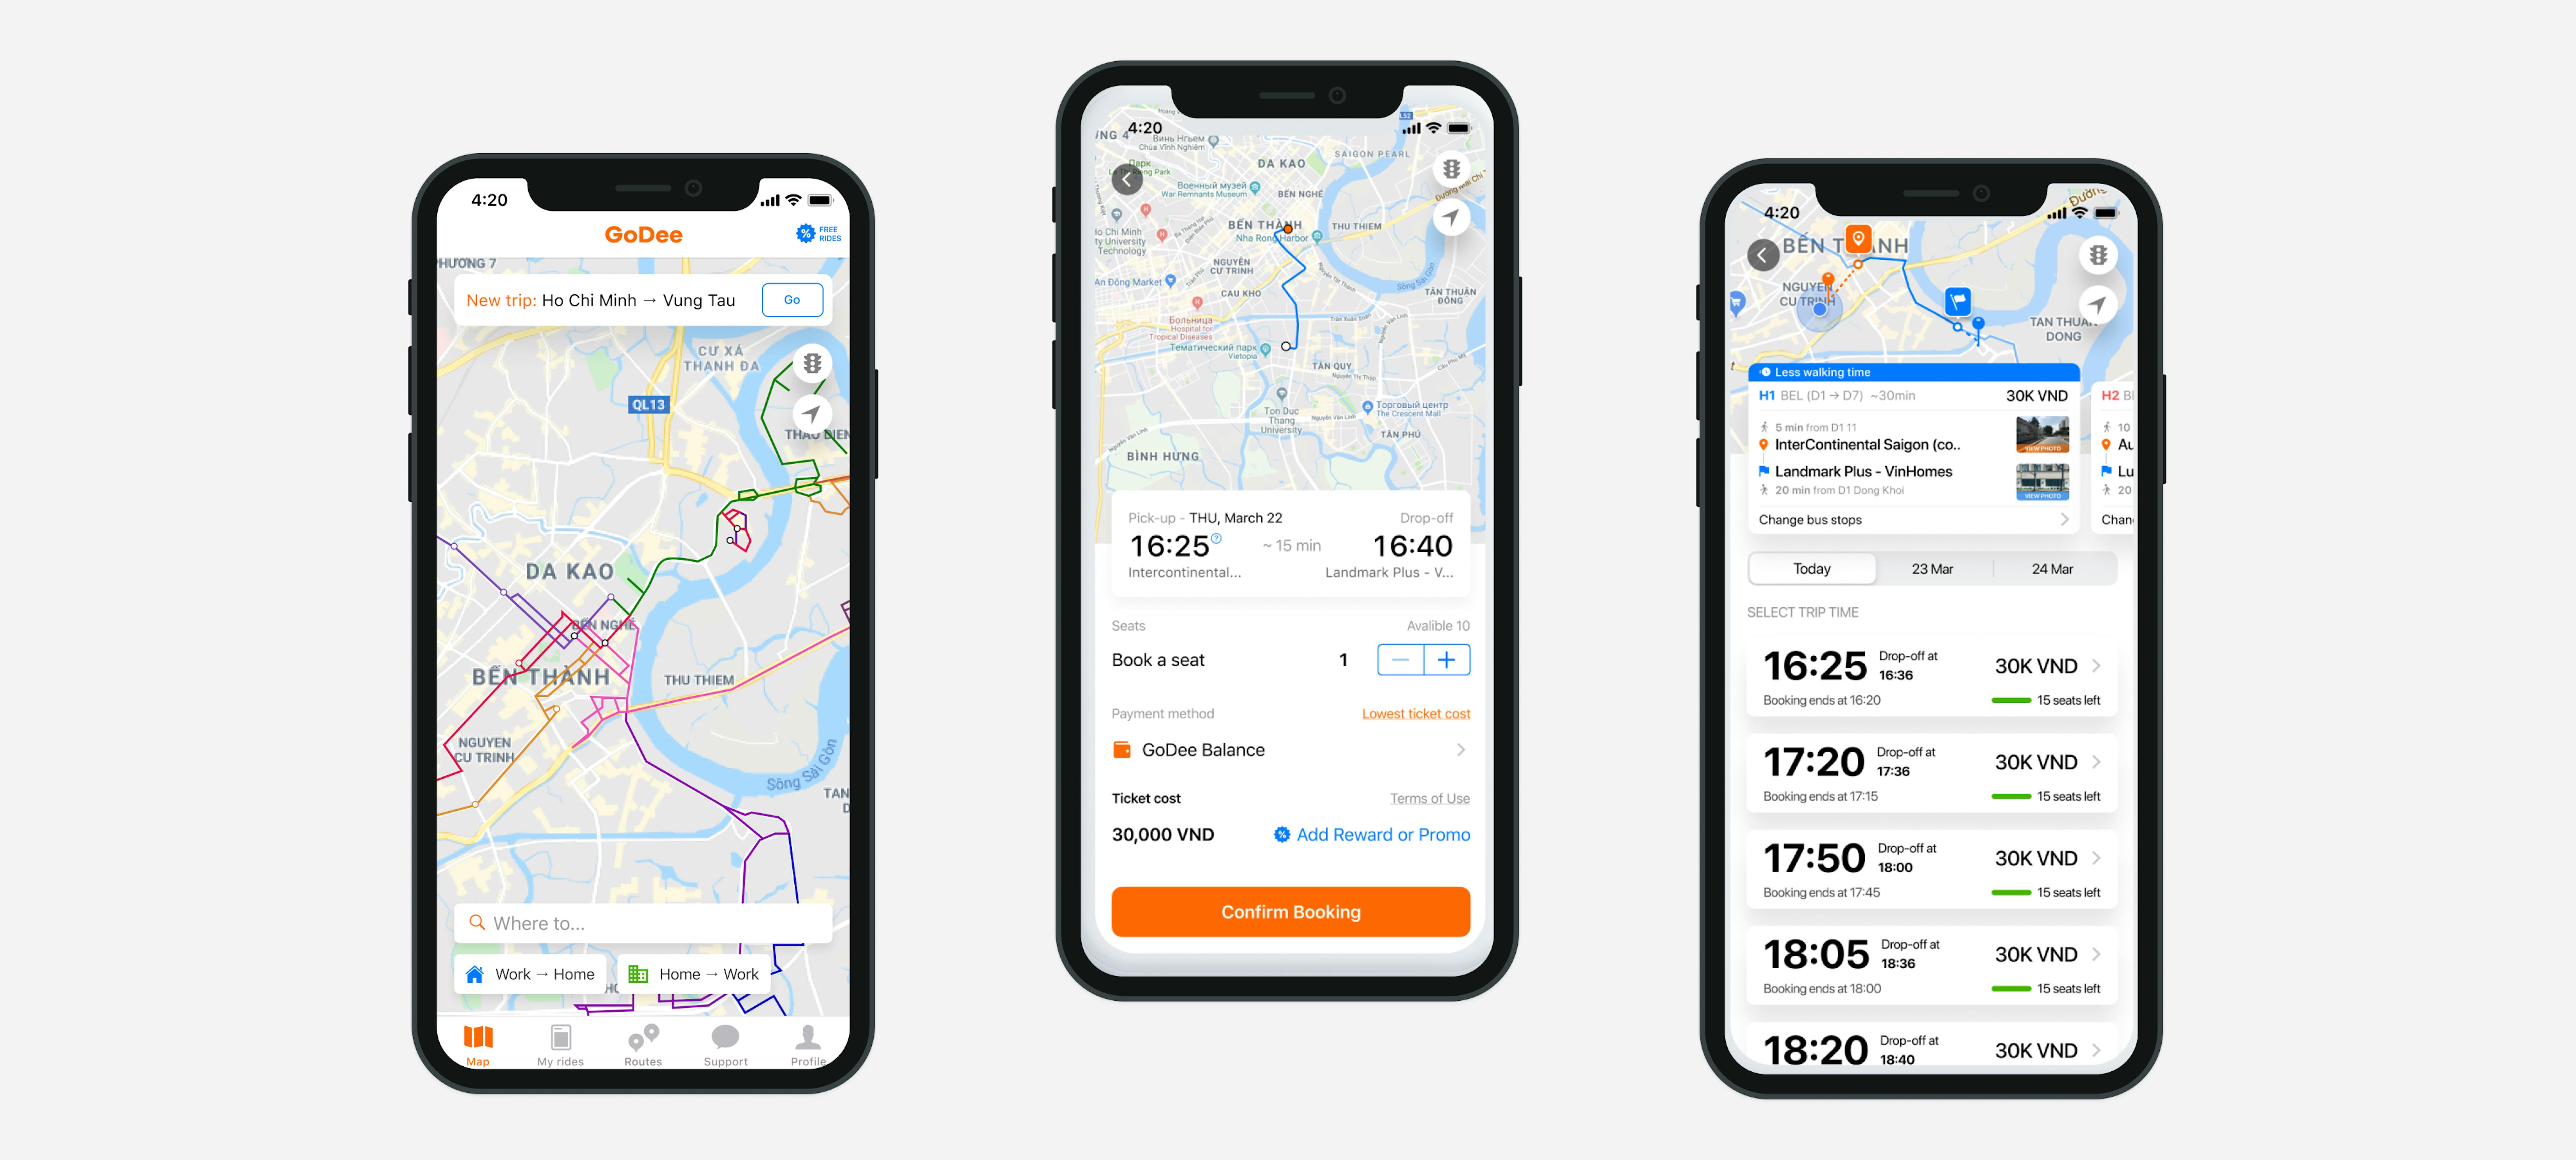
In sum, a prototype is not a full-fledged solution but rather an imitation of a product. However, a prototype has all the necessary ingredients, such as visual representation, structure, and basic functionality, to provide a clear idea of the future product and serve to aid in better planning.
The prototyping process in software development
With an understanding of the differences between these elements in the design process, it is time to review the simple but important procedure any team creating a prototype will follow. If they want to start with a wireframe and or mockup, those two stages will obviously come first and will serve as an outline for the prototype and help gather some initial feedback. Otherwise, the team can begin with the first step below.
- Define goals and requirements
Talk to stakeholders to define the purpose of the prototype. Determine whether it will test user interactions, validate design choices, or demonstrate functionality. - Add interactivity
Based on the results of the first step, use prototyping tools (Figma, Adobe XD, InVision) to add clickable elements, transitions, and animations that simulate user interactions. Define how users navigate between screens and how elements respond to actions. - Conduct usability testing
Share the prototype with users, stakeholders, and developers for feedback. Conduct usability tests to identify pain points, improve navigation, and refine the user experience before moving to development. - Iterate and improve
Based on feedback, refine the prototype by adjusting layouts, interactions, or features. This cycle may repeat multiple times until the prototype is validated for development. - Handoff to development
Once finalized, developers receive the prototype along with documentation or design specifications to ensure a smooth transition from design to code.
The focus on iterations in this process helps refine the product early and reduces costly changes during development.
Mockup vs. prototype
While similar, there are clear differences between a mockup and a prototype. A mockup is a static visual representation of a user interface designed to showcase the final look and feel of a product. It focuses on the visual elements such as layout, colors, typography, and imagery to provide a detailed preview of the design without any interactivity. In the SDLC, mockups are typically used for design validation and to allow stakeholders to see how the product will look before development begins. They help ensure alignment with branding and design guidelines but do not simulate user interactions or functionality.
In contrast, a prototype is an interactive version of the design that mimics the user experience and flow of the product. It reflects decisions that stakeholders make at the mockup stage of the process. Unlike mockups, prototypes allow users to click through and engage with the interface to give them a more realistic sense of how the final product will behave. Prototypes are essential for testing the overall user experience before full development starts.
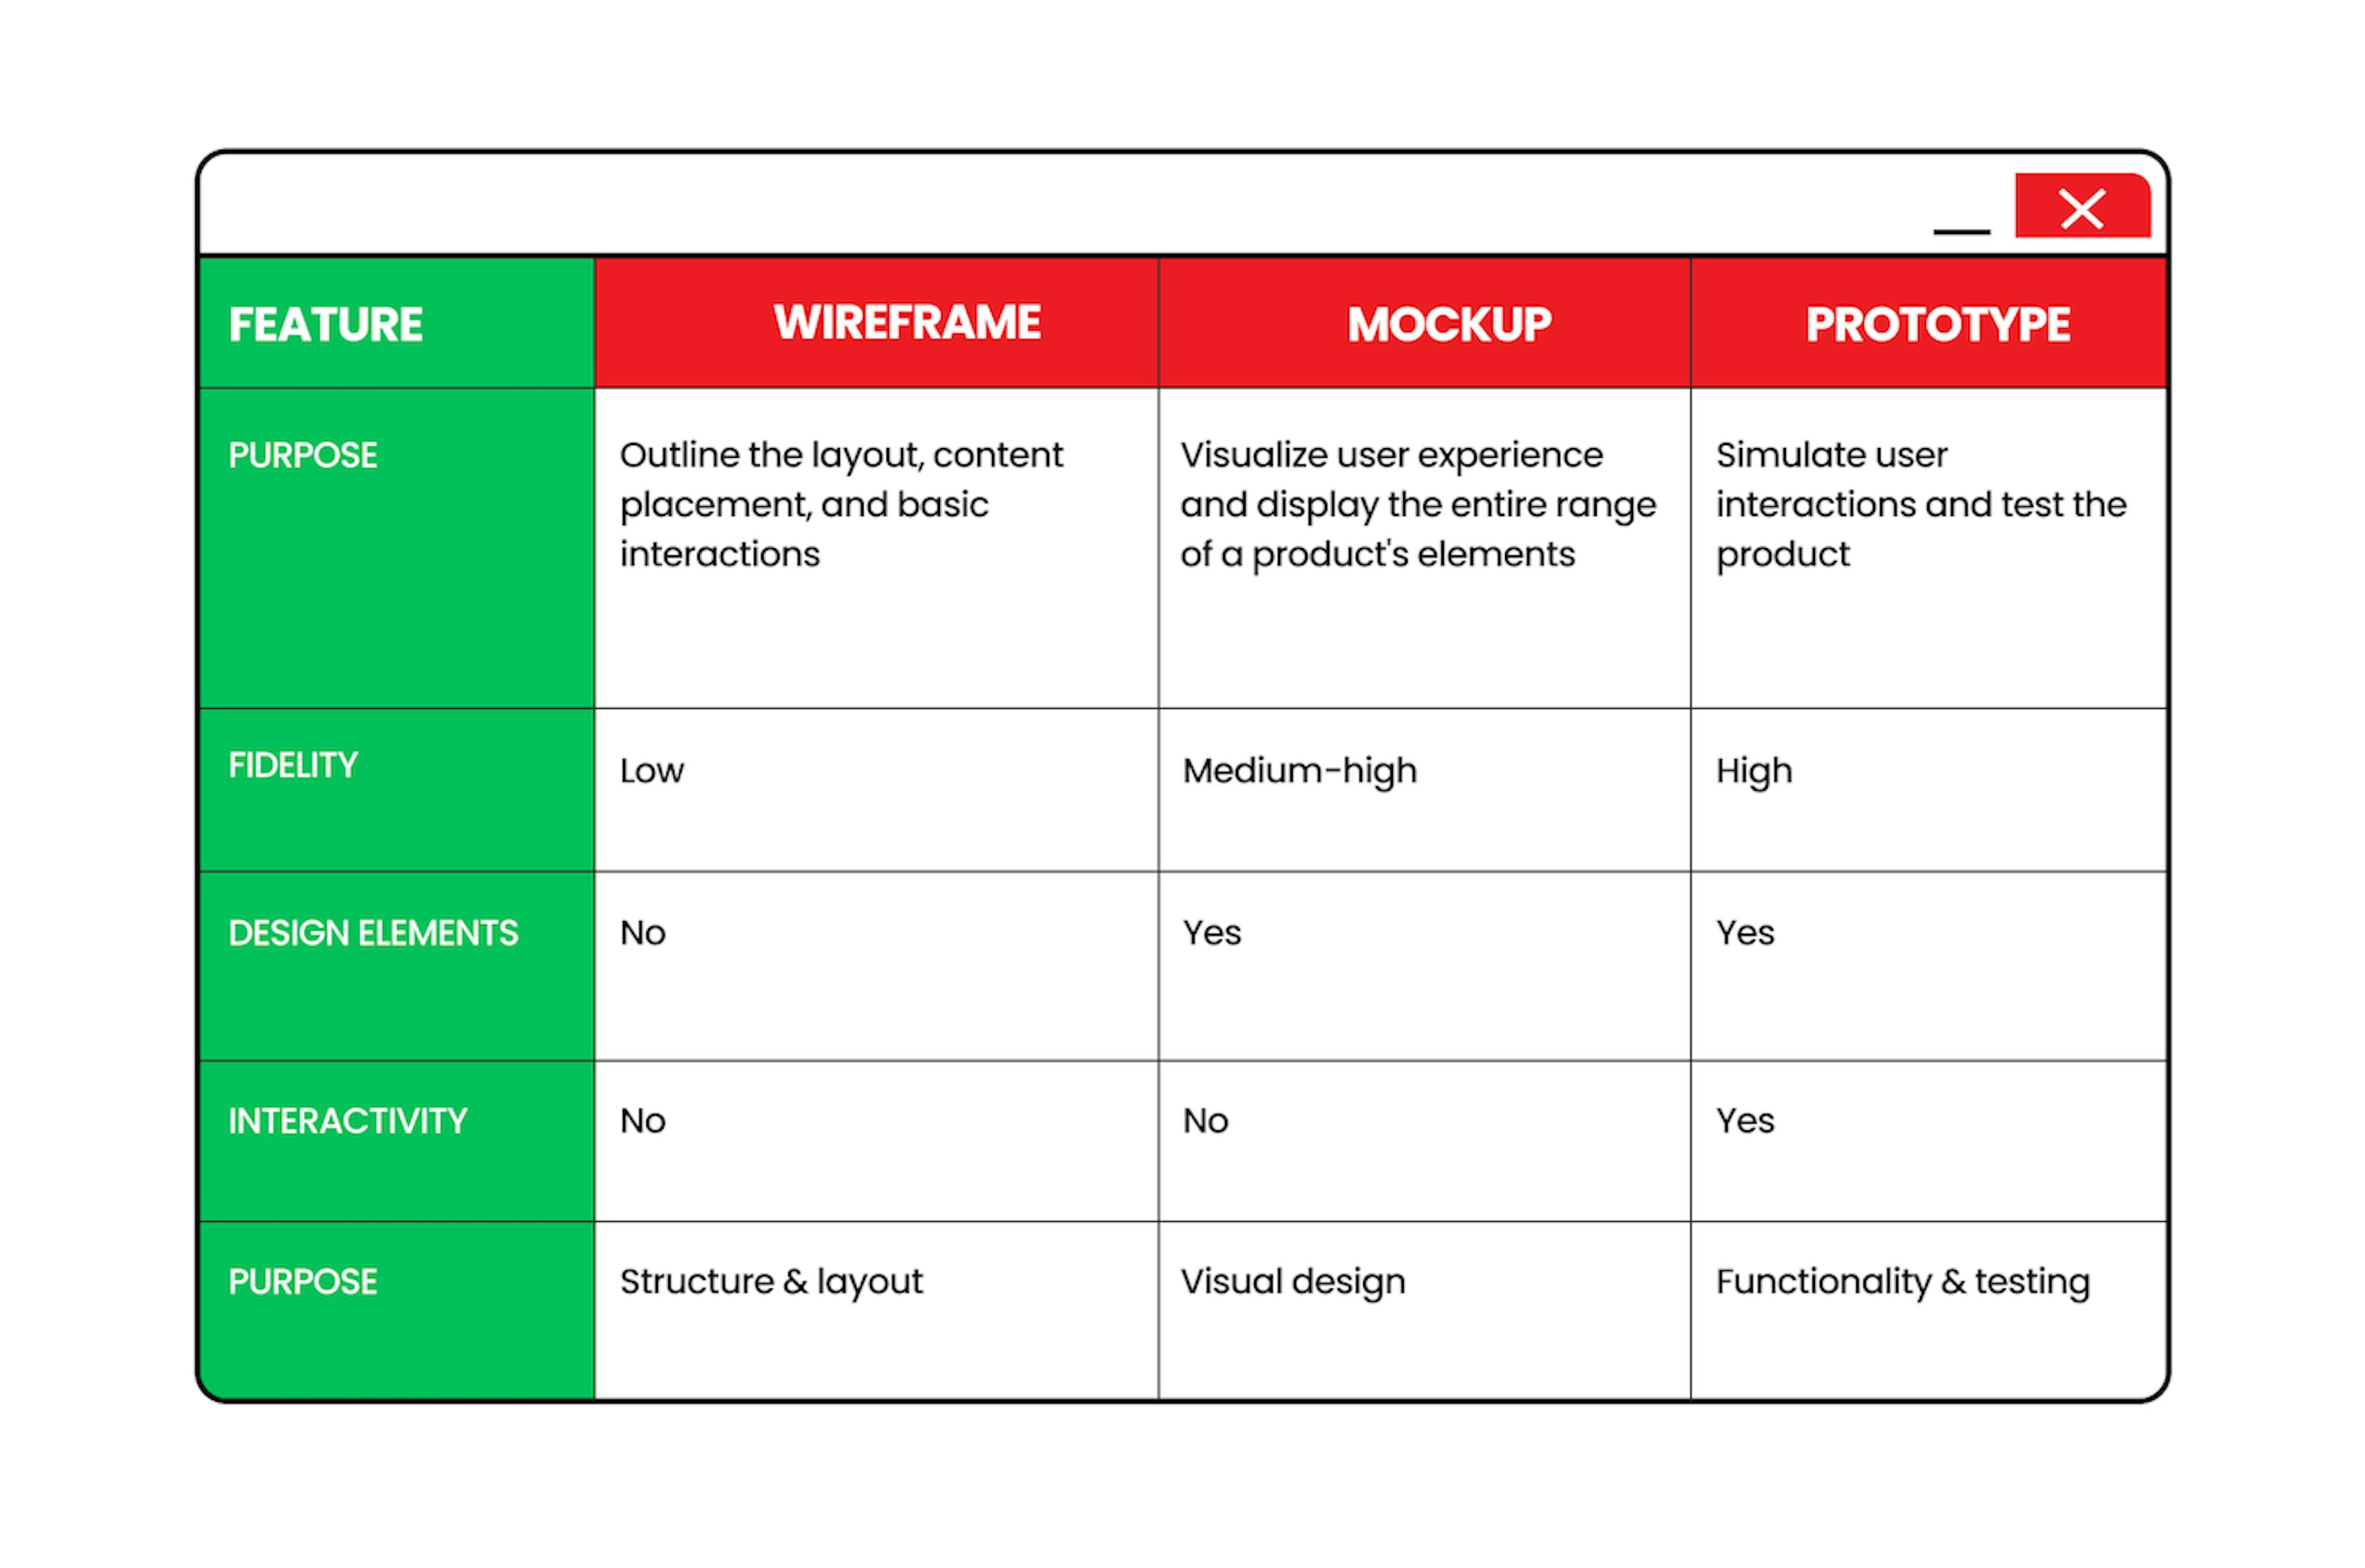
For a concise look at the differences between wireframes, mockups, and prototypes, please refer to this table:
The purpose of mockups and prototypes
As mentioned above, mockups and prototypes play specific roles within the software development process; however, they are not always necessary. If a project team receives enough feedback during the mockup stage, for example, it may not be helpful to create a prototype. Likewise, after producing a wireframe, the team may feel confident enough to skip a mockup and make a prototype. With that said, there is no single answer to whether a team will need all three or only one or two of these stages. To understand which path is best, it's helpful to consider the benefits of each.
4 benefits of using a mockup in software development
Mockups come in very handy when a team needs to see their future solution as soon as possible and decide on changes and improvements before they've moved further along in the development process.
1. Provides a clear vision of the future product
Mockups help teams better understand the final result. For example, certain colors may not match with the logos, the images might not fit, and the typography might look awkward. In discussions, these decisions may seem correct, but a mockup will demonstrate how the product looks in reality.
2. Gives developers a guide
A mockup can serve as a UX/UI guide for front-end developers. Moreover, it's a well-thought-out structure that contains every detail about the product that has been approved by all stakeholders. That means the front-end team can roadmap the development process and feel certain there won't be a need for rework.
3. Saves time and money
It's much easier, faster, and less costly to make edits before any code has been written. Thus, by looking at the mockup, teams can see whether everything is in its proper place and replace components or change the whole design without severe delays if necessary. If a team waits to make corrections once developers have begun writing the code, the product deadline may require an extension, which can lead to increases in costs.
4. Serves as clear evidence
A mockup can be a compelling argument for either current or potential investors. Unlike schematic wireframes, mockups are vivid. They can show what a product is and act as visual evidence of progress.
4 benefits of using a prototype in software development
With its interactive nature, prototypes offer teams the opportunity to test the product and solution. This, in turn, allows users and stakeholders to give feedback that is targeted at specific functionalities. Thus, prototyping allows designers to tweak the designs in a way that best reflects user expectations.
1. See the product in action
By prototyping software, designers can simulate its functionality to show how the product will work and how users will interact with it in real life. Drop-down menus, animated elements, clickable buttons, and links are all available in prototypes.
2. Test and improve
In theory, a product may work, but teams will learn much more when they can test the functionality, responsiveness, usability, and other characteristics of the future product before giving it to users. Extensive testing can help fix current issues, improve UI and UX design, and reduce potential problems.
3. Receive early feedback
Building a prototype is a shortcut to user feedback and timely adjustments. For example, the team could remove unnecessary features, add new ones, or even change the concept of the product.
4. Reduce project duration and budget
After testing the prototype and collecting feedback, teams can introduce relevant changes. At this stage, modifying the product is a pain-free process for developers (there's no need to rewrite the code) and for the client (fixing a prototype is much quicker and cheaper). Resolving issues in the early version of the product can speed up further development and prevent costly redesign after the product launch.
Discover why software prototyping matters through EasyEDA's hardware approach. This guide in 2 parts shows how project setup and team collaboration in electronic design mirrors essential software mockup principles, helping you visualize concepts before full development.
Both of these steps in the design process deliver benefits to teams through a more realistic representation of their product. Without this visualization, it will be difficult to understand how well the theory of a product matches user expectations. Teams that want to skip these steps entirely will need to prepare themselves for negative feedback and intense reworking of features. However, given the advantages of mockups and prototypes, most teams recognize their use.
5 tips to create better mockups and prototypes
To reap the benefits of mockups and prototypes, teams need to consider several factors throughout the process. These involve careful scrutiny of stakeholder requirements and patience to keep the users at the center of the concept.
1. Clarify client requests at the beginning
It's important to understand the "why" behind client desires and identify the problem they want to solve. If the client wants, for example, the user's profile to appear first when they open an app, the team will want to clarify the reason for this request.
2. Agree on a single concept
Client and stakeholder requirements and requests may produce various ideas for how the product will work and look. Don't get distracted by all the possibilities. Focus on a single concept to present to stakeholders. Their feedback will guide the team to better variations if necessary.3.
The team will find it helpful to understand the fine details of how users will move around the product before they add extra details and elements. This approach prioritizes users and the information that is relevant to them.
4. Focus on essential functions
While a prototype is an excellent opportunity to demonstrate what a product can do, the team should avoid overdeveloping it. It can't be a final or perfect product without feedback and testing; therefore, concentrate on primary functions, develop them, and move the product to the next stage.
5. Find the right users for testing
Regardless of the nature of the product or service, it's important to develop a proper testing procedure that delivers quality feedback. This involves a mix of users familiar with the type of technology the team is developing and those without such experience. This will provide useful insights into the UI and UX of the product from different viewpoints.
With these tips, any team will produce a mockup or prototype that will save them time and other resources in the long term and reduce tension between team members.
Mockups and prototypes lead to better products
Mockups and prototypes, and wireframes as well, are essential steps in the software development life cycle. Both of them represent an early version of a future software solution and offer a number of benefits, such as demonstrating the team's effectiveness to a client, generating investments, or simply gathering feedback to improve the final product. Some teams may decide to skip a mockup and begin prototype development; however, there are no specific guidelines for when this is appropriate. It's most important to understand the product under consideration and stakeholder requirements before making such a decision. In any case, mockups and prototypes serve as helpful guides to bring teams closer to a viable and successful product.

